pdf转markdown-Marker工具的使用
注意:必须使用python3.10及以上的版本,搜先需要安装CUDA,CUDA须按照以下图片中的几个版本,再安装pytorch,安装pytorch的命令须根据如以下图片中的“pip3 install torch torchvision torchaudio”,具体安装命令根据系统和CUDA版本而定,默认情况下是可选的,如果您使用 tesseract,则为必需。某些 PDF,甚至是数字 PDF,其中
安装
1.您需要 python 3.9+ 和 PyTorch。如果不使用 Mac 或 GPU 计算机,则可能需要先安装 CPU 版本的 torch。
注意:必须使用python3.10及以上的版本,搜先需要安装CUDA,CUDA须按照以下图片中的几个版本,再安装pytorch,安装pytorch的命令须根据如以下图片中的“pip3 install torch torchvision torchaudio”,具体安装命令根据系统和CUDA版本而定,有关更多详细信息,请参阅此处。
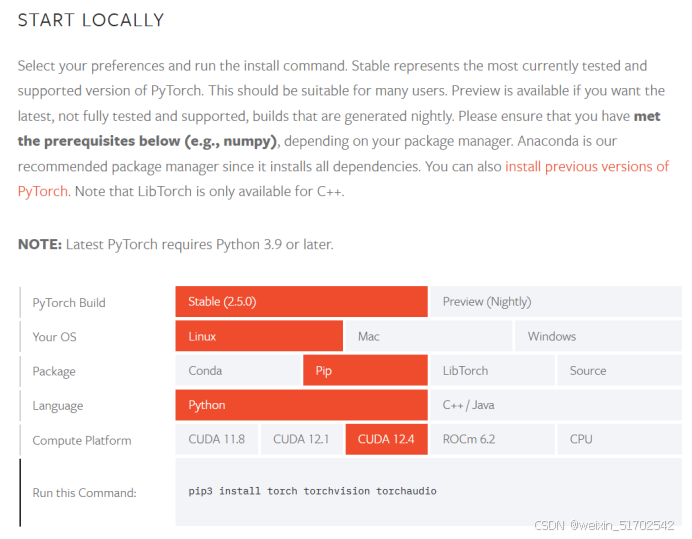
打开命令行,安装marker工具,安装方式:
pip install marker-pdf
2.OCRMyPDF
仅当想使用 optional 作为 ocr 后端时才需要。请注意,这包括 Ghostscript(一个 AGPL 依赖项),但通过 CLI 调用它,因此它不会触发许可证规定。ocrmypdfocrmypdf
请参阅此处的说明
Linux
- Run apt-get install ocrmypdf
- Install ghostscript > 9.55 by following these instructions or running scripts/install/ghostscript_install.sh.
- Run pip install ocrmypdf
- Install any tesseract language packages that you want (example apt-get install tesseract-ocr-eng)
- Set the tesseract data folder path
- Find the tesseract data folder tessdata with find / -name tessdata. Make sure to use the one corresponding to the latest tesseract version if you have multiple.
- Create a local.env file in the root marker folder with TESSDATA_PREFIX=/path/to/tessdata inside it
Mac
Only needed if using ocrmypdf as the ocr backend.
- Run brew install ocrmypdf
- Run brew install tesseract-lang to add language support
- Run pip install ocrmypdf
- Set the tesseract data folder path
- Find the tesseract data folder tessdata with brew list tesseract
- Create a local.env file in the root marker folder with TESSDATA_PREFIX=/path/to/tessdata inside it
Windows
- Install ocrmypdf and ghostscript by following these instructions
- Run pip install ocrmypdf
- Install any tesseract language packages you want
- Set the tesseract data folder path
- Find the tesseract data folder tessdata with brew list tesseract
- Create a local.env file in the root marker folder with TESSDATA_PREFIX=/path/to/tessdata inside it
用法
首先,一些配置:
- 检查中的设置。您可以使用环境变量覆盖任何设置。marker/settings.py
- 您的 torch device将被自动检测到,但您可以覆盖此设置。例如。TORCH_DEVICE=cuda(命令使用GPU运行)
- 默认情况下,marker 将用于 OCR。Surya 在 CPU 上速度较慢,但比 tesseract 更准确。它也不需要您在文档中指定语言。如果您想要更快的 OCR,请设置为 .这也需要外部依赖项(见上文)。如果您根本不需要 OCR,请设置为 .suryaOCR_ENGINEocrmypdfOCR_ENGINENone
- 某些 PDF,甚至是数字 PDF,其中的文本质量不佳。设置为在发现标记输出错误时强制使用 OCR。OCR_ALL_PAGES=true
至此,所有的配置完成。当第一次运行marker工具时,需要HuggingFace下载模型,HuggingFace网站属于外网,国内用户无法访问,可使用以下方法:
配置临时生效的设置
如果您只需要临时使用镜像地址,可以在当前终端会话中运行以下命令:
export HF_ENDPOINT="https://hf-mirror.com"
验证:您可以运行以下命令来查看环境变量是否生效:
echo $HF_ENDPOINT
注意:这种方式只在当前终端会话中有效,关闭会话后设置会消失。
转换单个文件
marker_single /path/to/file.pdf /path/to/output/folder --batch_multiplier 2 --max_pages 10
- --batch_multiplier是如果有额外的 VRAM 时将默认批量大小乘以多少。数字越高,需要的 VRAM 越多,但处理速度越快。默认情况下设置为 2。默认批处理大小将占用 ~3GB 的 VRAM。
- --max_pages是要处理的最大页数。省略此项可转换整个文档。
- --start_page是要从中开始的页面(默认为 None,将从第一页开始)。
- --langs是文档中语言的可选逗号分隔列表,用于 OCR。默认情况下是可选的,如果您使用 tesseract,则为必需。
surya OCR 支持的语言列表在这里。如果需要更多语言,可以使用 Tesseract 支持的任何语言(如果设置为 .如果您不需要 OCR,marker 可以使用任何语言。OCR_ENGINEocrmypdf
转换多个文件
marker /path/to/input/folder /path/to/output/folder --workers 4 --max 10
- --workers是一次要转换的 PDF 数量。默认情况下,此值设置为 1,但您可以增加此值以增加吞吐量,但代价是 CPU/GPU 使用率更高。Marker 在高峰期每个工作线程将使用 5GB 的 VRAM,平均使用 3.5GB。
- --max是要转换的最大 PDF 数。省略此项可转换文件夹中的所有 PDF。
- --min_length是在考虑处理 PDF 之前需要从 PDF 中提取的最小字符数。如果您正在处理大量 pdf,我建议设置此项以避免对主要是图像的 pdf 进行 OCR。(放慢一切)
- --metadata_file是 JSON 文件的可选路径,其中包含有关 PDF 的元数据。如果您提供它,它将用于设置每个 pdf 的语言。设置 language 对于 surya 是可选的(默认),但对于 tesseract 是必需的。格式为:
{
"pdf1.pdf": {"languages": ["English"]},
"pdf2.pdf": {"languages": ["Spanish", "Russian"]},
...
}
您可以使用语言名称或代码。确切的代码取决于 OCR 引擎。请参阅 此处 有关 surya 代码的完整列表,以及 此处 对于 tesseract。
用法可参考:GitHub - VikParuchuri/marker: Convert PDF to markdown quickly with high accuracy

2万人民币佣金等你来拿,中德社区发起者X.Lab,联合德国优秀企业对接开发项目,领取项目得佣金!!!
更多推荐


 22
22 0
0- 0


 已为社区贡献1条内容

所有评论(0)